|
|
This error message indicates that you have designed
a format that is too wide to be printed, and you have
to correct the situation before Cardbox can print.
In some cases, people have trouble working out what
went wrong, so here is a list of information for you
to gather. The act of gathering the information
may show you what the trouble is; but if it doesn't,
telling us everything that you have found out will make
it easier for us to help you.
Printable area

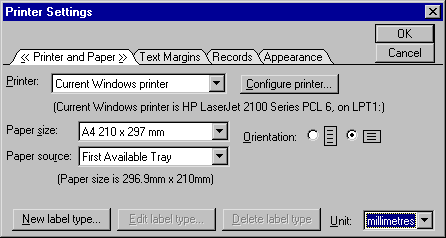
Use the command File, Printer Settings and note
the paper size (and the label size, if applicable).
You can work in inches or millimetres (see the Unit
control at the bottom right-hand corner).

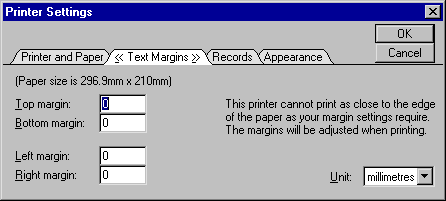
Switch to the Text Margins page and note any margins
that have been set. Be aware that most printers
cannot print up to the edge of the paper, so even if
you have specified a margin of zero, the real margin
will be considerably larger. The exact amount
is decided by the printer driver and is outside Cardbox's
control: typically, it is about ¼" or 6mm.
|
| Problems
with fonts: Some Microsoft fonts (for example,
those installed with Internet Explorer 5.0)
contain misleading information about character width,
which can confuse Cardbox into thinking that a format
is twice as wide as it really is. Releases
of Cardbox 2.0 after 16-Feb-01 are immune to
this problem, but if you have an older release,
and especially if the problem has appeared suddenly,
try downloading the
latest version before you do any more investigation. |
|
Fonts

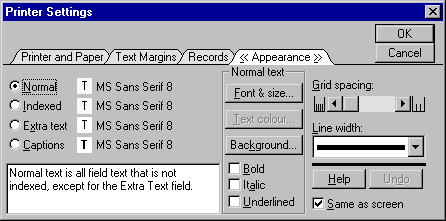
Switch to the Appearance page and note the name and
size of all four fonts that are listed there.
Now close the Printer Settings dialog box.
|
|
"Same
as screen": If this option is set, then
Cardbox is using the same fonts for printing and
for display, which means that whenever you change
the appearance on the screen, using the View,
Appearance command, you are also changing the
printed appearance. If "Same as screen"
is not set, then Cardbox is using different fonts
for printing and for display, and the View, Appearance
command will have no effect on the printed layout.
We mention this because it can be very puzzling
when you try View, Appearance and it seems to
have no effect on printed margins.
|
|
Format width
Use the command Edit, Format, Edit to view the
layout of the format that you are trying to use.
 Look
at the top right-hand corner and note the position of
the red triangle that indicates the edge of the format.
As an additional guide, the colour of the blue background
changes at this point (you may need to scroll sideways
to see all this). In the example, the triangle
is in column 128, so the format has 127 columns (from
1 to 127). Look
at the top right-hand corner and note the position of
the red triangle that indicates the edge of the format.
As an additional guide, the colour of the blue background
changes at this point (you may need to scroll sideways
to see all this). In the example, the triangle
is in column 128, so the format has 127 columns (from
1 to 127).
 Next,
make sure that the option View, Printable Area
is turned on. You will now see a bold black box
showing the area in which it is possible to print.
Note the column in which you see the right-hand edge
of the box. In the example, the line is in column
122, so there is room to print 121 columns with the
paper size, font size, and margins that you have selected. Next,
make sure that the option View, Printable Area
is turned on. You will now see a bold black box
showing the area in which it is possible to print.
Note the column in which you see the right-hand edge
of the box. In the example, the line is in column
122, so there is room to print 121 columns with the
paper size, font size, and margins that you have selected.
|
|
If
you can't read the labels clearly enough to see
what column you are in, move the mouse into that
column and look at the status display at the bottom
of the screen.
|
|
What to do next
Now that you have all the pieces of the puzzle, it
should be possible for you to work out what is going
on. Here are some possible cures:
- Make the format narrower
- There may be some unused blank space between the
rightmost field and the edge of the format.
You can try dragging the red triangle to the left
to get rid of this space, but don't drag it so that
you leave a field partly outside the format, because
as soon as you save the format, Cardbox will expand
it again, to accommodate all the fields.
- Redesign the format
- You can use the black box as a guide, and redesign
the fields so that they all fit within it; then move
the red triangle to make the format narrower.
- Change printer, paper, or margins
- Remember that you can't reduce margins below a certain
amount (the amount varies from one printer to another)
because most printers are simply not capable of printing
very close to the edge of the paper. If you
do reduce the margin too far, Cardbox will have to
use the margin that is built in to the printer driver
for your printer.
- Change font
- If "Same as screen" was set in the Appearance
page of Printer Settings, then you have a choice:
you can use View, Appearance to change the
screen display and the printed appearance simultaneously,
or you can use Edit, Printer Settings to change
the printed appearance only.
In the latter case (or if "Same as screen"
was not set), you should be aware that the format
layout you see on the screen reflects the fonts and
sizes that you chose for the screen display, not for
the printed layout. The black box that indicates
the printable area will always be calculated using
the printed appearance, so that as you change the
printed font, the size of the black box will change
on the screen.
- Change grid spacing
- Cardbox calculates format layout using a character
grid, because this makes it easy for you to change
font sizes without wrecking the layout. You
can use the Grid Spacing control (part of the Appearance
pages) to adjust the width of a column in this grid
without changing the actual font size. This
can sometimes be a good way of quickly making a layout
printable if it was only slightly too wide to start
with.
|
|
|
|
|